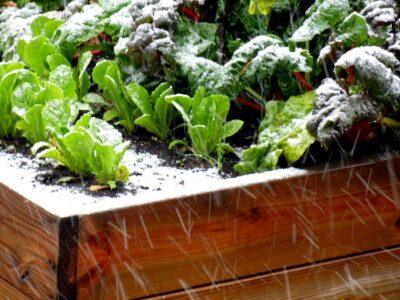
Image source: DeepRootsAtHome
The beginning of winter need not be the end of your growing season. People are increasingly turning to homegrown food, and they don’t want to be put off by frost or a few inches of snow.
There are several frost-hardy vegetables which will help you extend the season. For example, you can plant root vegetables such as carrots, radish and beetroot late in the autumn and then leave them to grow under a thick layer of mulch.
They can be dug up in the middle of the winter to get some really sweet tubers. But you don’t have to settle for root veggies alone. With a little extra effort and spending, you can grow a variety of greens and other vegetables for your table throughout winter.
Here are a few ways to beat the frost:
1. Invest in a greenhouse.
Why not? It is the most ideal structure to create a controlled environment. It is the most ancient, too. Greenhouses have been around in some form or other from the time of the Romans. In the Netherlands, they use extensive high-tech greenhouses covering acres of land to produce almost all the food to feed people in the country despite some pretty nasty winter weather.
Don’t worry — it is not necessary to go high-tech to grow produce during the winter. A less ambitious greenhouse can definitely provide fresh vegetables come frost or snow. If glass was the main component of original greenhouses, the use of new lightweight, durable materials like polycarbonate sheets has brought greenhouses within the common man’s reach.
There are a number of ready-to-assemble kits on the market that will not bust your wallet but are practical and sturdy enough to get the job done. Of course, if you are a little handy, you can always construct your own greenhouse for a fraction of the cost. There are numerous plans available for free online.
Once you have your greenhouse, you will be pleasantly surprised to find that you can grow not only almost all the vegetables you want, but even dwarf fruit trees, too.
2. Assemble a cold frame.
 A cold frame is a miniature version of a glass greenhouse. If you have a glazed window or door to spare, you can assemble one quickly and cost effectively. The main parts are a wooden frame and a roof or lid that fits over it. The lid should move up and down on hinges to allow you access to the vegetable bed. You should be able to keep it open on props on warmer days.
The frame can be made of four pieces of seasoned wood. If you already have a raised vegetable garden growing in wooden boxes, check whether those boxes can be fitted with the glass top by attaching hinges. You can grow your salad greens in beds or in pots inside these frames. Since the sides do not allow light in, they shouldn’t be too high.
You can go for spinach, different types of lettuces, and some low-growing herbs as the bed is very easy to access. Smaller and sweeter greens like mache or bitter ones like mizuna also can be grown. Put in some carrots and radishes that will give you sweet tubers to pull up anytime during the winter and beyond.
The cold frame needs a bit of ventilation. The plants need to breathe and get a fresh supply of CO2 for making their food. Propping up the roof every now and then is sufficient. Or, leave a small gap between the frame and the lid by keeping a piece of wood in between. Air circulation is important in keeping the plants free of fungal infections like botrytis.
3. Build a straw bale cold frame.
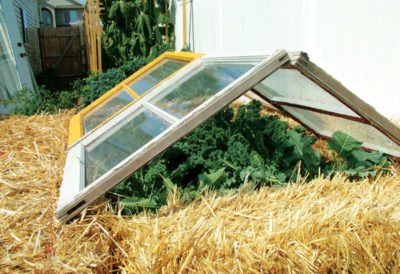
If you don’t want to bother with a wooden frame or hinges, a quick and easy alternative is using straw bales to make the frame. You may need more space, of course, but you can easily make it as extensive as you wish, depending on the number of glazed windows you can get your hands on.
Line up the bales to make a rectangular enclosure slightly smaller than the dimensions of the window frame. If you are using several windows, you can arrange the bales in two long rows and support the windows on two sides only. You can use transparent polypropylene sheets or even polythene sheets in place of glazed windows. Since they are lightweight materials, they have to be weighted down by bricks.
The width of the straw bale makes it difficult to access the vegetable bed, so taller vegetables like leek, spring onions and Swiss chard are ideal choices. Between them you can leave your carrots and turnips and shallots to grow for spring harvest.
A great thing about straw frames is that you can build it around existing vegetable patches in your garden. So, extend the harvest of tomatoes and peppers by building a straw frame around them and covering with plastic sheeting. As an added bonus, you can also use the straw for mulching and be done with it.
4. Make hoop tunnels.

Image source: HomesteadBloggersNetwork
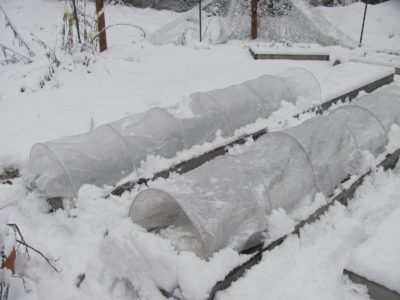
This is a simple arrangement of flexible PVC pipes bent into a semicircle and covered by a polythene sheet. The length of the PVC pipe used to make the hoops determines the height of the tunnel. You can calculate the minimum length required to cover your vegetable bed using the formula to find the circumference of a circle. The width of the bed is the diameter, and when multiplied by pi, it gives the circumference. You should take half the circumference and add three inches extra at both ends for driving them into the ground. Or you can use rebar stakes driven into the ground at regular intervals to anchor the hoops.
Depending on the height of your hoop tunnel, you can plan your veggies, the taller ones like collard greens and kale going in the middle, and shorter spinach, lettuce, cabbage, broccoli along the edges. Spring onions and scallions can be accommodated somewhere in between. The plants should not be touching the polythene sheets.
Hoop frame tunnels can be as long or wide as you would want them to be, but if you’re expecting snow cover, there should be a firm support running along the center of the frame.
5. Put up A-frame cloches.
Cloches are plant covers to protect individual plants, and originally were made from glass. In places where winters are mild, even upturned clay pots can give frost protection at night. A conventional foldable A-frame can be converted into a cloche during winter to grow taller vegetables.

Image source: MotherEarthNews
All you need is a sufficiently large polythene sheet to cover the whole structure. Cut a flap window on the sides for air circulation as well as for viewing. You can grow tall plants in the middle and shorter ones nearer to the edges. Accessing the growing area can be difficult unless you make a long vertical cut on one short edge by way of a door. You can pin the openings closed with tape or clothespins.
If you prop the frame at a steep angle, snow collection can be avoided, even though inside space will be reduced. Come spring, you can use the same frame for growing veggie climbers. You can give them a head start by planting them undercover much earlier than usual.
Selecting the vegetables to grow in winter
When you select vegetables for planting in your frost cheaters, go for those that are naturally frost hardy. Quick growing veggies like radishes and broccoli are great choices as you can have several harvests throughout winter if you keep planting them in batches.
Don’t forget vegetables like turnips and onions that offer their leaves for harvest while plumping up their roots and bulbs under the ground, giving you double advantage. Leek is the most favored by the English in winter. Many perennial herbs can be successfully grown in your undercover winter gardens.
Look out for new varieties that are being developed exclusively for cold climates. Experiment all you can; you’ll find what suits you and your climate.

No comments:
Post a Comment